proxy配下でgitを使ったinstallコマンドがつかえない時の解決法
まず、最も簡単な解決法としては、
$ vim ~/.gitconfig
とgitconfigを開き
[http]
        proxy = http://proxy.example.com:8080
[https]
        proxy = http://proxy.example.com:8080
こう書いて保存する。
これでcloneはできるはず。
$ git config --list
で設定を確認できる。
これでgit cloneはできるはずだが、luarocksのように間接的にgit cloneを行う場合gitにアクセスできない場合がある。
これは、clone先のurlが
http://github.com/**
ではなく
git://github.com/**
となっているためである。(自分の場合はそうだった)
そのため、gitconfitに
[url "https://"]
        insteadOf = git://
と書き、すべてhttps://からcloneするようにすれば解決した。
CentOS6.6にMongoDBをインストールしてテストしてみた
CentOS6.5にMongoDBをインストールする - Qiitaを参考にしました。
環境確認
まずは、CentOSのバージョンを確認する。(CentOS6も7にもMongoは対応してるっぽいけど一応)
$ cat /etc/redhat-release
-> CentOS release 6.6 (Final)
のように確認できた。またMongoは64bitにしか対応してないようなのでそれも確認
$ arch
-> x86_64
インストール手順
リポジトリの作成
# vim /etc/yum.repos.d/mongodb.repo
に
[mongodb]
name=MongoDB Repository
baseurl=http://downloads-distro.mongodb.org/repo/redhat/os/x86_64/
gpgcheck=0
enabled=1
を書いてリポジトリを作成する
yumでインストール
# yum install -y mongodb-org
これを行うと以下のように5つのパッケージがインストールされる
================================================================================
 パッケージ                アーキテクチャ
                                         バージョン        リポジトリー    容量
================================================================================
インストールしています:
 mongodb-org               x86_64        2.6.12-1          mongodb        4.6 k
依存性関連でのインストールをします。:
 mongodb-org-mongos        x86_64        2.6.12-1          mongodb        6.9 M
 mongodb-org-server        x86_64        2.6.12-1          mongodb        9.1 M
 mongodb-org-shell         x86_64        2.6.12-1          mongodb        4.3 M
 mongodb-org-tools         x86_64        2.6.12-1          mongodb         90 M

トランザクションの要約
================================================================================
インストール         5 パッケージ
テスト
Mongoの立ち上げ
まずは起動するために
# service mongod start
-> Starting mongod:                                           [  OK  ]
と出れば無事起動している
シェルの起動
ターミナルにMongoを立ち上げた状態でmongoと入力すればシェルが立ち上がる
$ mongo
-> MongoDB shell version: 2.6.12
connecting to: test
>
動作確認
> use test
switched to db test
> db.fish.insert({name: "マグロ"})
WriteResult({ "nInserted" : 1 })
> db.fish.find()
{ "_id" : ObjectId("5743eafd09dd5531de1012a6"), "name" : "マグロ" }
> db.dropbDatabse()
2016-05-24T14:50:06.260+0900 TypeError: Property 'dropbDatabse' of object test is not a function
> db.dropDatabse()
2016-05-24T14:50:11.306+0900 TypeError: Property 'dropDatabse' of object test is not a function
> db.dropDatabase()
{ "dropped" : "test", "ok" : 1 }
> show dbs
admin  (empty)
local  0.078GB
> exit
bye
C++を使ってMongoを操作
qiita.com
ここが非常に参考になった。
ここもよい。
http://rest-term.com/archives/2948/
Macの同アプリ内でのウインドウ切り替え
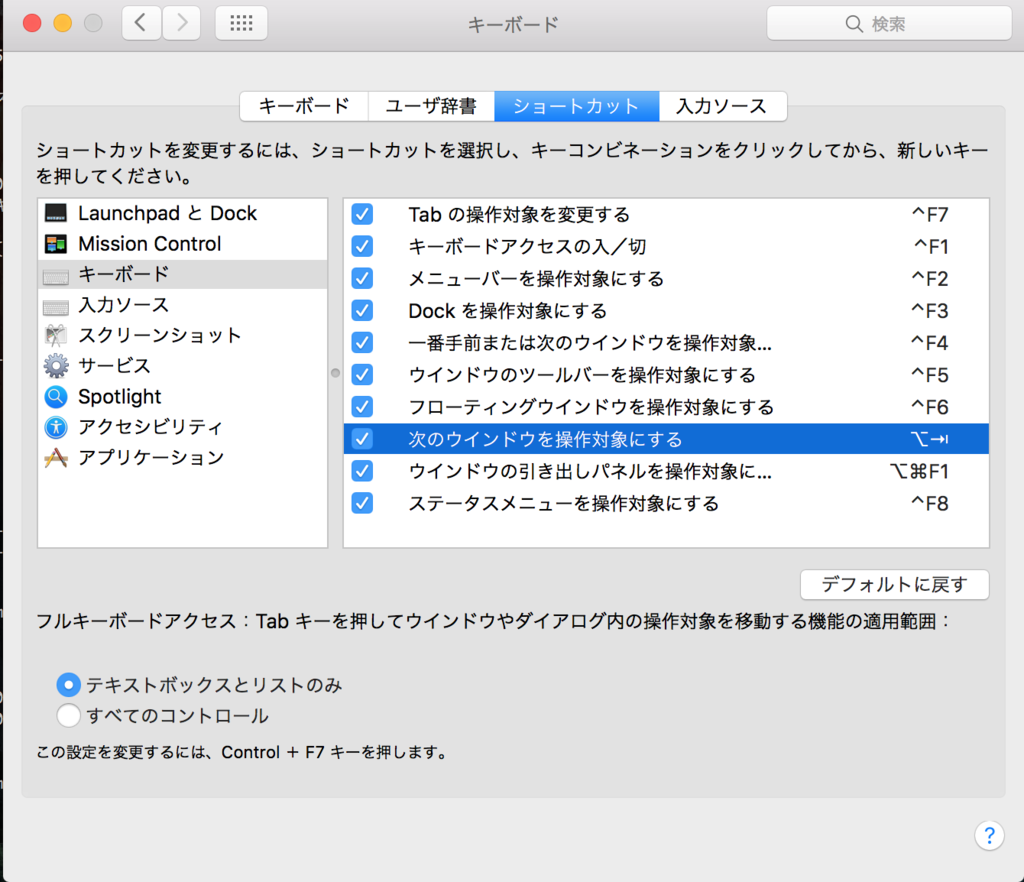
例えばターミナルを二つ立ち上げている時、もう片方のウインドウに操作を切り替えたいとする。その時のショートカットの設定は、
キーボード -> ショートカット -> キーボード -> 次のウインドウを操作対象にする
を選んで好きなショートカットを割り当てる。自分はoption+tabにした

これはかなり便利!
Uniduinoを使ったUnityとArduinoの通信
大きく分けて2つの方法がある。一つはSerialPortを使う方法、もう一つはUniduinoを使う方法。
Uniduinoは20$必要ですが、その分非常に使いやすく手間も省けるので自分はUniduinoを使います。SerialPortを使った方法については
SerialPort または Uniduino を使った Unity と Arduino を連携させる方法調べてみた - 凹みTips
を参照してください。
それではUniduinoの使い方
1. UniduinoをAssetStoreからダウンロードする
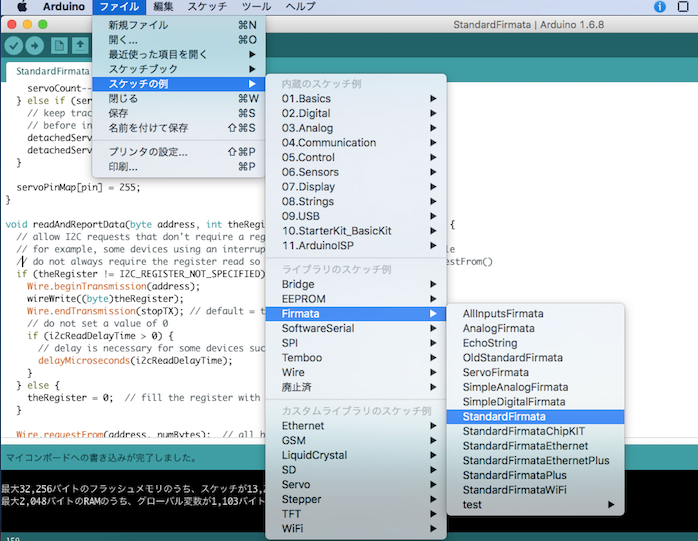
2. Arduinoを開いて以下のようにプロジェクトを開いて焼き込む(Arduino側の設定はこれだけ、もしコンパイルが失敗したら、ポートの設定を確認すべき)

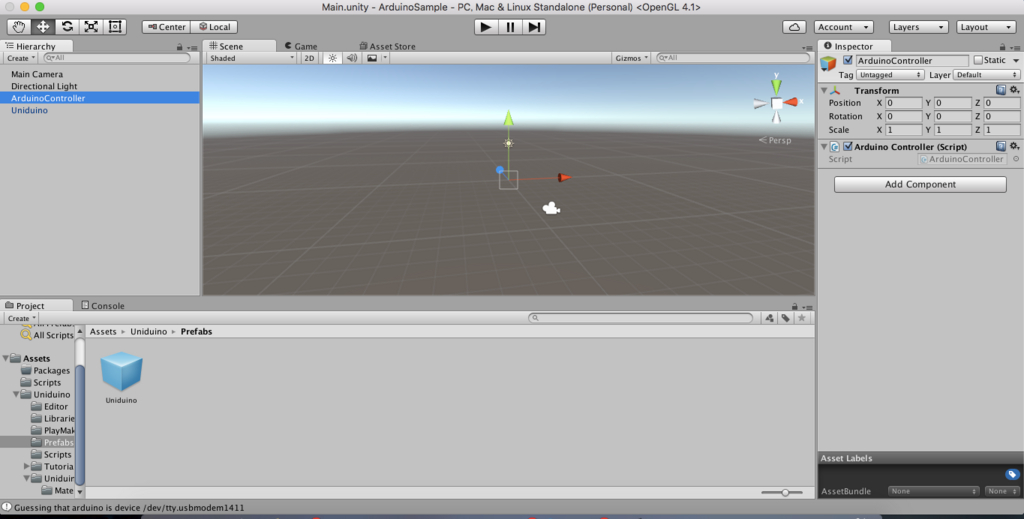
3. Unityを開いてUniduino/Prefab/Uniduinoをシーン上に配置(最初は、Window/UniduinoからInstall~を実行してUnityを再起動)
4. シーン内に適当なサンプル(ArduinoController)を配置し、適当なコード(ArduinoController.cs)を登録させる

5. コード内にArduinoと同じようなコードを記述する。以下参照
using UnityEngine;
using System.Collections;
using Uniduino;

public class ArduinoController : MonoBehaviour {

    private Arduino arduino;
    private int leg = 11;
    private int down = 12;
    private int up = 13;
    private int i = 0;

    void Start () {
        // インスタンスを取得
        arduino = Arduino.global;
        if (arduino == null) {
            Debug.Log ("arduino's instanse is null");
        }
        arduino.Setup (ConfigurePins);

        // コルーチンでループ
        StartCoroutine (Loop());
    }

    // Pinの設定
    void ConfigurePins()
    {
        arduino.pinMode(up, PinMode.OUTPUT);
        arduino.pinMode(down, PinMode.OUTPUT);
        arduino.pinMode (leg, PinMode.OUTPUT);
    }

    private IEnumerator Loop()
    {
        while (i < 200) {
            arduino.digitalWrite(leg, Arduino.HIGH);
            yield return new WaitForSeconds(1);
            arduino.digitalWrite(leg, Arduino.LOW);
            arduino.digitalWrite(down, Arduino.HIGH);
            yield return new WaitForSeconds(1);
            arduino.digitalWrite(down, Arduino.LOW);
            arduino.digitalWrite(up, Arduino.HIGH);
            yield return new WaitForSeconds(1);
            arduino.digitalWrite(up, Arduino.LOW);
            i++;
        }
    }
}
Activity(端末)とExtension(グラス)間の通知
まず、ActivityとControlExtenstionとのやりとりはExtensionServiceを介して行われます
ControlExtenstionはExtensionService内でつくられるので問題ないのですが、Activity側はExtensionServiceを持っていないので持ってこなきゃダメ
Activity -> ControlExtensionへの通知
これはホストApp(MainActivity)でGPSを取得して、それをControlExtensionでGPSの情報を表示したい時などに役立ちます。
まずActivity内でExtensionServiceを持ってきます
public void onCreate(final Bundle savedInstanceState) {
        super.onCreate(savedInstanceState);

        if (SampleExtensionService.Object == null) {
            Intent intent = new Intent(Registration.Intents
                    .EXTENSION_REGISTER_REQUEST_INTENT);
            Context context = getApplicationContext();
            intent.setClass(context, SampleExtensionService.class);
            context.startService(intent);
        }
}
SampleExtensionService.Objectがない場合はSampleExtensionService内で
public static SampleExtensionService Object;
と宣言してください
そして、Extensionに通知したいタイミングで
if (HelloWorldExtensionService.Object != null) {
  HelloWorldExtensionService.Object.SendMessageToExtension("Hello SmartEyeglass");
}
を行えばExtensionServiceに対してメッセージが送られます。
もちろんExtensionServiceはsendMessageToExtensionを受け取った時の処理を記述する必要があります
まずはExtensionService内でControlExtenstionのインスタンスを作ります(作り方は自由)
そして、そのインスタンスのメソッドに対してメッセージを送ります
public void SendMessageToExtension (String message) {
    // ControlExtensionにメッセージを送るメソッド
    SampleControlExtenstion.DisplayMessage(message);
}
ここではDisplayMessageというメソッドをSampleControlExtenstion内に作りましたが、なんでもいいです。もちろん引数はStringじゃなくてもOK
ExtensionServiceを経由することを忘れず注意すれば意外と簡単にできましたね
ControlExtension -> Activity
これもExtensionServiceを経由するので頑張るのはExtensionService
ExtenstionService内でインテントを作成して、その中にメッセージを埋め込みます
・ExtensionService
public void sendMessageToActivity(final String message) {
        Intent intent = new Intent();
        intent.setClass(getBaseContext(), HelloWorldActivity.class);
        intent.addFlags(Intent.FLAG_ACTIVITY_NEW_TASK);
        intent.putExtra("Message", message);
        startActivity(intent);
    }
・Activity
// Intent内のExtras()を取得する
Bundle extras = getIntent().getExtras();
if (extras != null) {
  String message = extras.getString("Message");
  Toast.makeText(getApplicationContext(), message, Toast.LENGTH_LONG).show();
}
SmartEyeGlassに画像を表示する方法
初期設定
まずARイベント用ハンドラーであるSmartEyeglassEventListenerの登録を行う
private final SmartEyeglassEventListener listener = new SmartEyeglassEventListener() {
  @Override
  public void onARRegistrationResult(
     final int result, final int objectId) {
     if (result != SmartEyeglassControl.Intents.AR_RESULT_OK) {
       return;
     }
  }
  // Find bitmap to render when requested by AR engine
  @Override
  public void onARObjectRequest(final int objectId) {
     // send bitmap
       utils.sendARObjectResponse(renderObj, 0);
   }
  };
そしてSmartEyeglassControlUtilsのオブジェクトを生成し、初期設定
private final SmartEyeglassControlUtils utils;

utils = new SmartEyeglassControlUtils(hostAppPackageName, listener);
utils.setRequiredApiVersion(SMARTEYEGLASS_API_VERSION);
utils.activate(context);
imageMapにbitmapを登録
画像はbitmapにしてSmartEyeGlassに表示される
まずは、bitmapを複数格納する配列を用意する
private SparseArray<Bitmap> imageMap = new SparseArray<Bitmap>();
このimageMapにbitmapを入れる
// 配列の番号(キー)
int key;
// SAMPLE_PICTURE.pngが/res/drawable下にあるものとする
imageMap.put(key, R.drawable.SAMPLE_PICTUREのbitmap));
この処理を初めのタイミング(コンストラクタ内など)で使いたい画像全てに対して行うことでimageMapにbitmapが登録される。
けれど、肝心のbitmapはどう作ればいいのか??
bitmapはBitmapFactoryを使えば作れる
Bitmap b = BitmapFactory.decodeResource(context.getResources(), R.drawable.SAMPLE_PICTURE);
b.setDensity(DisplayMetrics.DENSITY_DEFAULT);
なので、このbを上にあるimageMap.putの第2引数にすればよい
こうしてimageMapに使いたいbitmapを無事登録できた。
bitmapをSmartEyeGlassに表示
これは実はそんなに難しくはない
まず、utilにrenderObjectを設定する
RenderObject renderObj = new RenderObject(OBJECT_ID, getBitmapResource(R.drawable.SAMPLE_PICTURE), 0, 0) {
  @Override
  public void toMoveExtras(Intent intent) {
  }
};
this.utils.registerARObject(renderObj);
そして、bitmapを表示する
// 欲しいbitmapのキー
int num = 0;
private static final int OBJECT_ID = 1;

Bitmap bitmap = imageMap.get(num);
utils.showBitmap(bitmap);
これだけで画像は表示できる。
もし、アニメーションを表示したい場合は、上の2つを変更する
CylindricalRenderObject  renderObj = new CylindricalRenderObject(OBJECT_ID,
                getBitmapResource(R.drawable.sample_00), 0,
                SmartEyeglassControl.Intents.AR_OBJECT_TYPE_ANIMATED_IMAGE,
                h, v);
this.utils.registerARObject(renderObj);
そして、アニメーションはtimerを使ってブレなく表示し続けるのが良さそう
// 欲しいbitmapのキー
int num = 0;
private static final int OBJECT_ID = 1;

// 追加
utils.enableARAnimationRequest();

timer = new Timer();
timer.schedule(new TimerTask() {
  private Handler mHandler = new Handler();
  @Override
  public void run() {
    mHandler.post(new Runnable() {
      public void run() {
        Bitmap bitmap = imageMap.get(num);
        utils.sendARAnimationObject(OBJECT_ID, bitmap);
      }
    });
  }
}, 0, ANIMATION_INTERVAL_TIME);
当然終了する箇所にはdisableをいれる
utils.disableARAnimationRequest();